LookBook
In This Article
What is the LookBook and What is a Look?
Looks are compositions that are saved and recalled. Creating a Look saves the color and intensity values for a chosen number of fixtures. Looks can be faded in and out over time to create transitions between different compositions. Looks can also be mixed to create new compositions.
The LookBook is where all Looks are created, stored, edited, and mixed.
What is a LookStack?
While a Look is a single set of intensity and color values, a LookStack can be thought of as multiple Looks strung together in a sequence. A LookStack has a play button that can be pressed to automatically transition from one "Page" to another, in a set order. LookStacks can also be looped to create repeating changes.
For more information on LookStacks, see the LookStack article.
Creating Looks
There are two ways to create a Look: from the LookBook or from the Scratchpad.
From the LookBook
To create a Look from the LookBook, first navigate to the LookBook using the bottom navigation bar, then press the + button in the upper right corner. After adjusting the initial Look Settings and tapping ‘Create’, the empty Look will appear in the LookBook.

From the Scratchpad
Alternatively, a Look can be created directly from the Scratchpad by pressing the ‘Create Look’ button in the Action Bar. This will create a new Look that contains all the selected fixtures on the Scratchpad, set to their current Scratchpad intensity and color values. Creating a Look this way will clear the manual intensity and color values for the selected fixtures and open up the newly created Look for editing.
To customize the Look Settings, like the Look Name and ID for the new Look, use the three dots menu in the upper right to bring up the Look Settings.
Clearing Manual Scratchpad Overrides
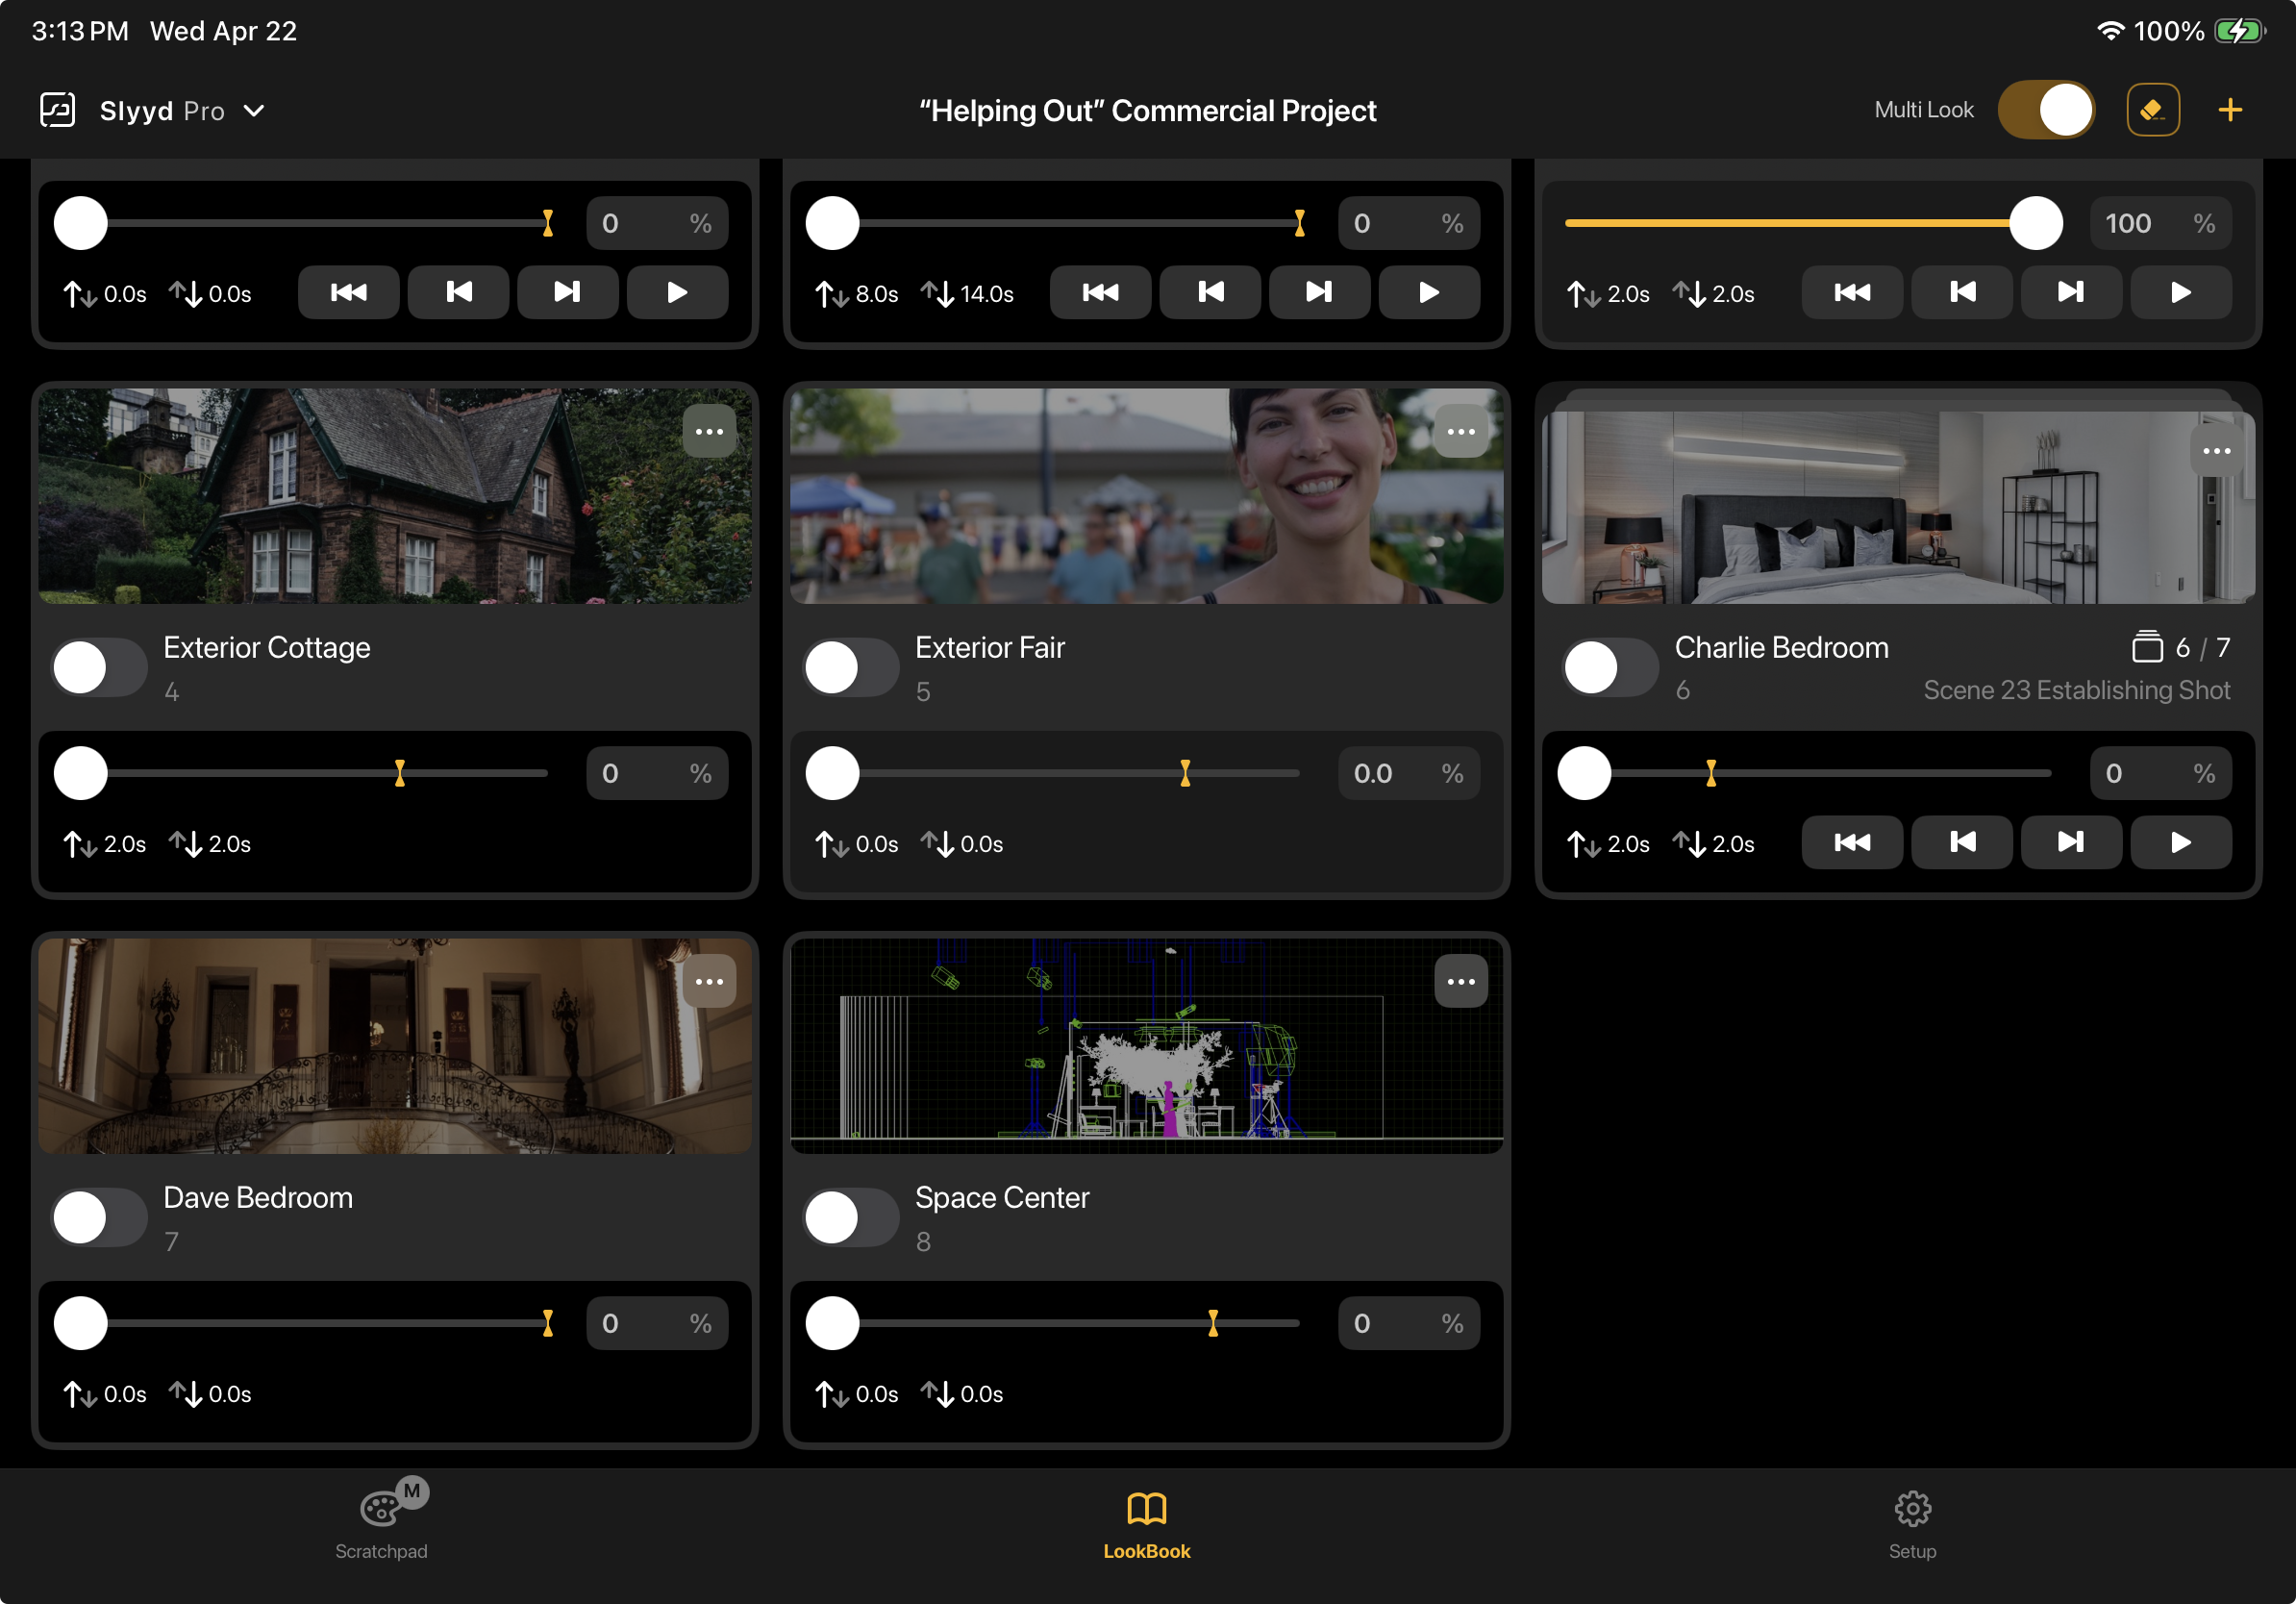
Values set on the Scratchpad override values set within Looks and LookStacks. As of Slyyd V1.6, relevant Manual Overrides can now be cleared directly from the LookBook, without having to navigate back to the Scratchpad. Manual Scratchpad Overrides can be cleared for all active Looks/LookStacks, or they can be cleared for an individual Look/LookStack.
For All Active Looks/LookStacks
To clear Manual Scratchpad Overrides for all active Looks/LookStacks, use this eraser button on the top of the LookBook. A Look/LookStack is 'active' if it is on, and has an opacity greater than 0%. After pressing the eraser button, choose one of two options:
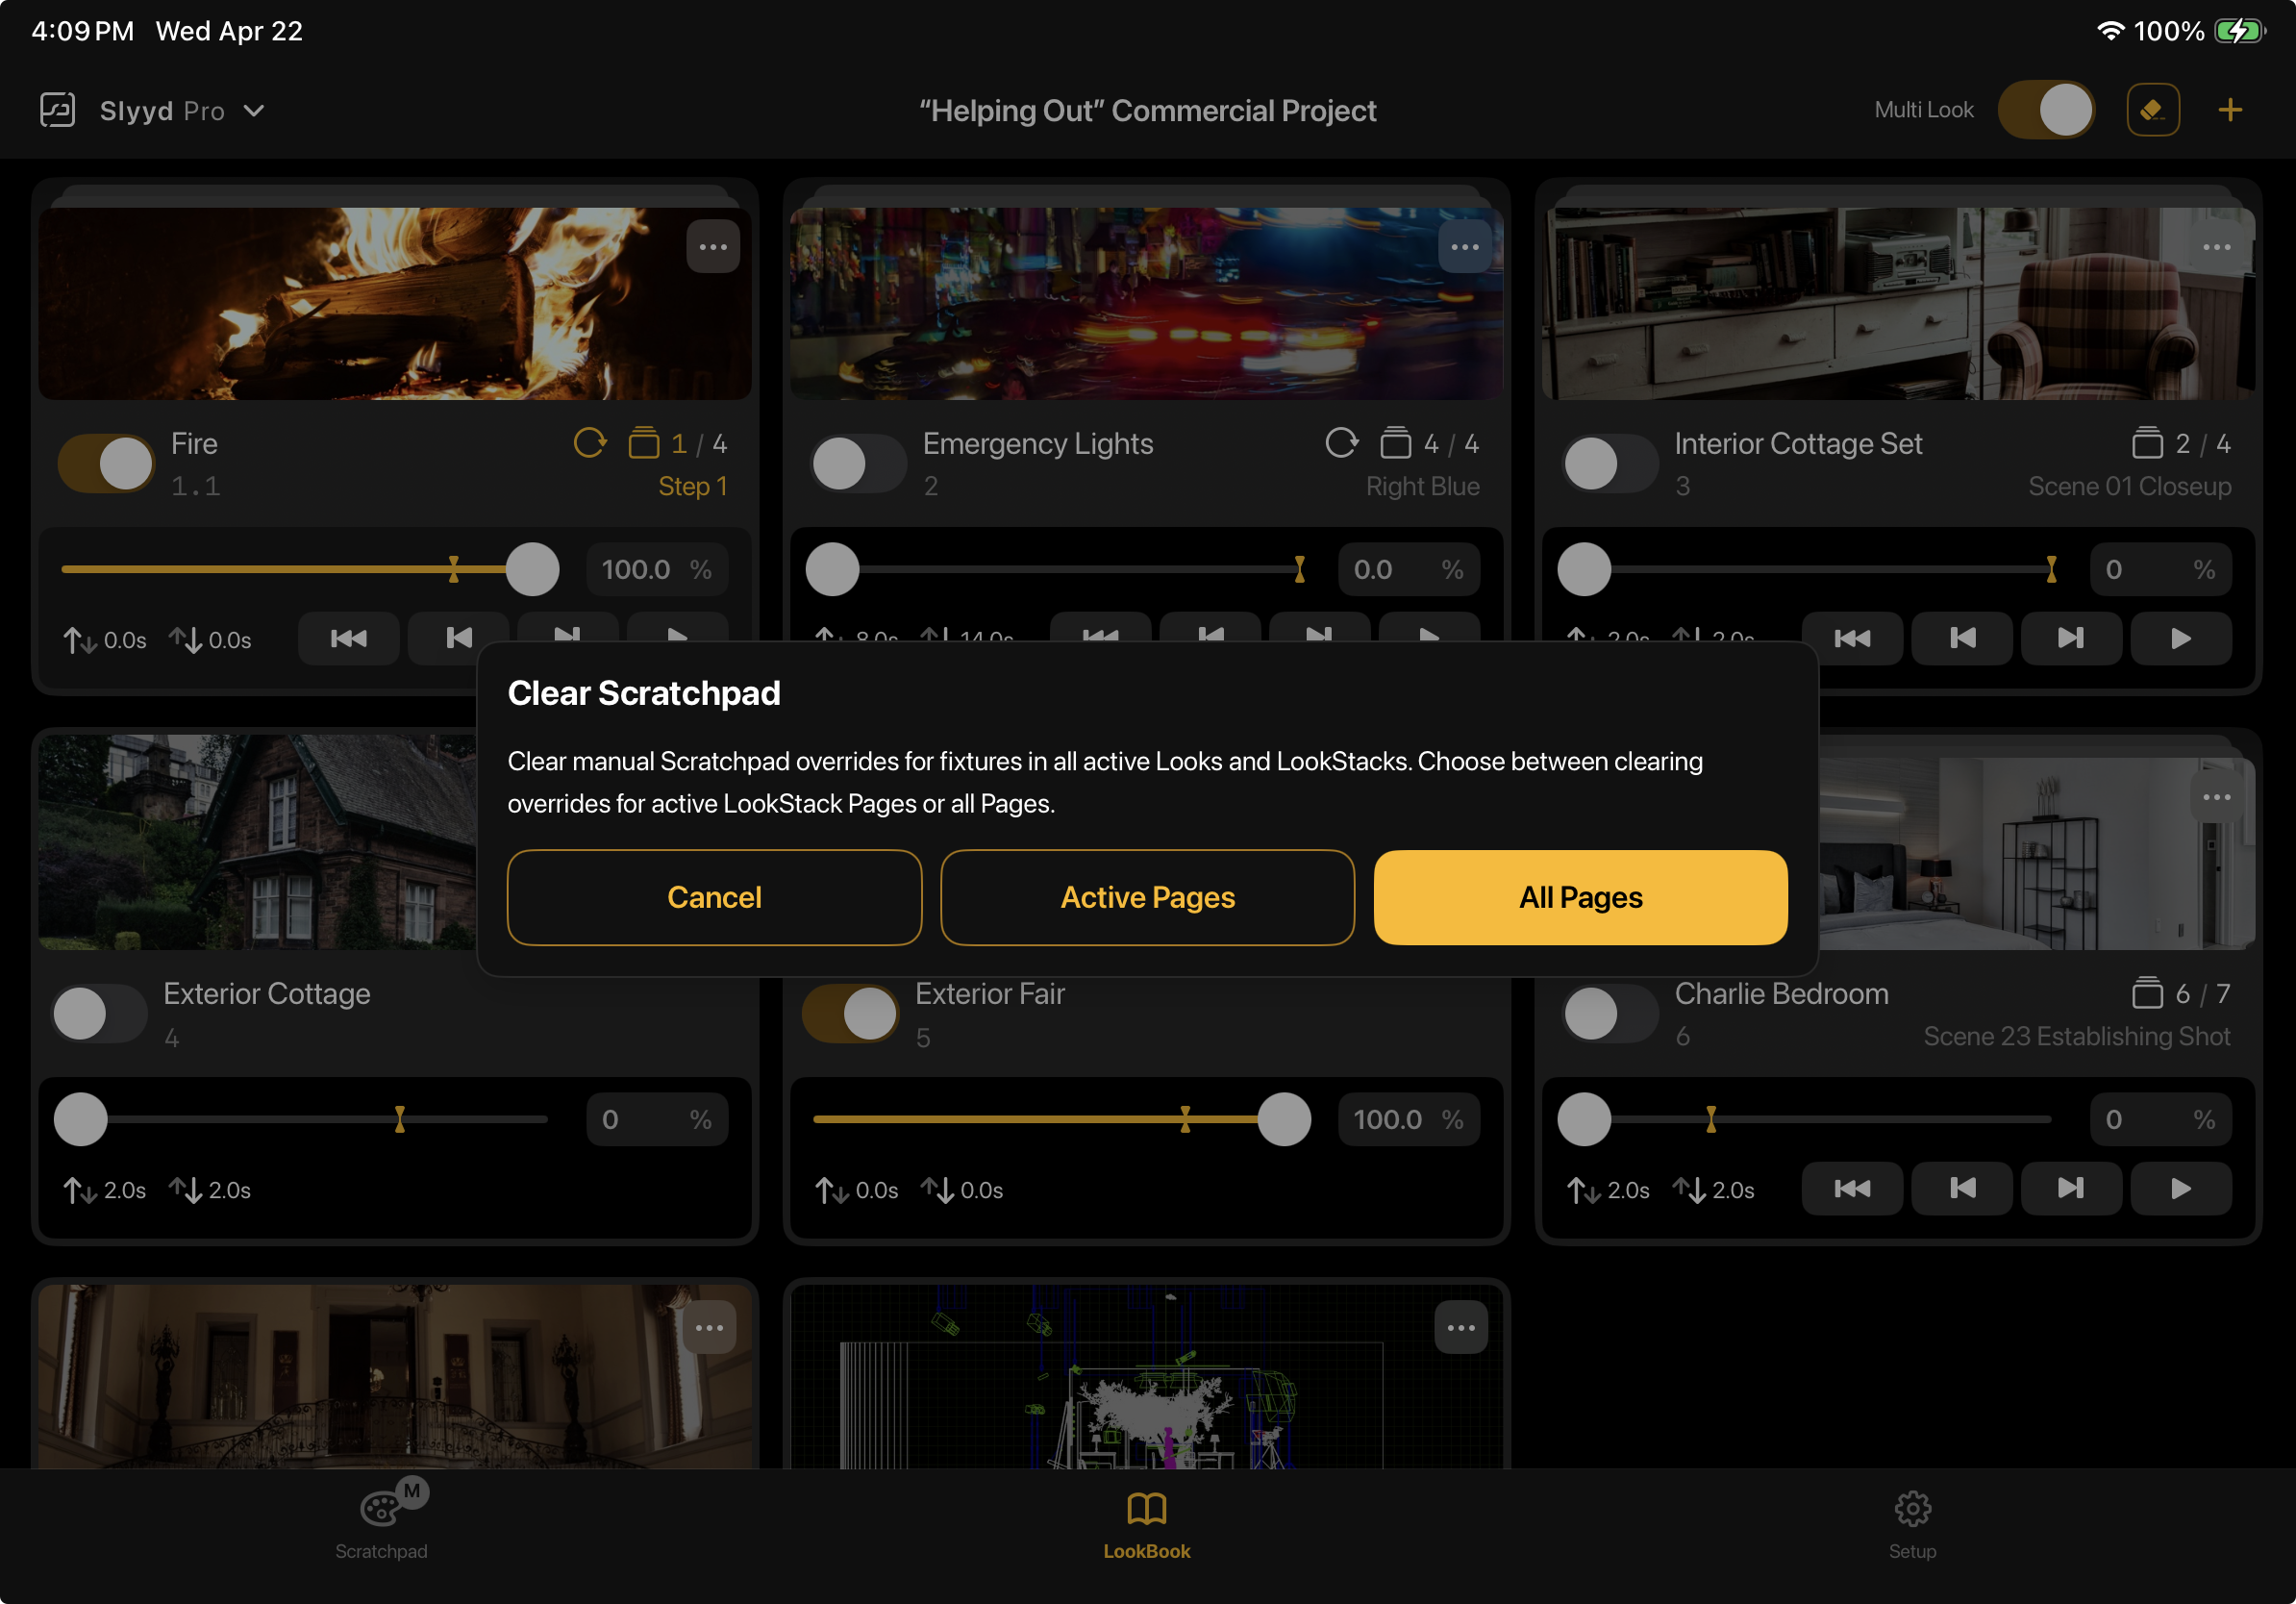
Active Pages - Clears the Overrides on fixtures contained within the current page of all active LookStacks, and all Looks. If any LookStacks are playing, this option is disabled.
All Pages - Clears the Overrides on fixtures contained within any pages of all active LookStacks, and all Looks.
For An Individual Look/LookStack
To clear Manual Scratchpad Overrides for an individual Look/LookStack, either use the three dots for the Look/LookStack on the LookBook to choose 'Clear Scratchpad', or use the three dots at the top of the Look/LookStack editor. This method can also clear Overrides for Looks/LookStacks that are not currently active or 'on', and can be useful to make sure that when they do turn on, their values will show up live.

After choosing 'Clear Scratchpad' for a LookStack, choose between two options:
Current Page - Clears the Overrides on fixtures contained within the current page. If the LookStack is playing, this option is disabled.
All Pages - Clears the Overrides on fixtures contained within any pages of the LookStack.
Choosing 'Clear Scratchpad' for a Look only offers a single option, but still gives the chance to cancel the action before proceeding.
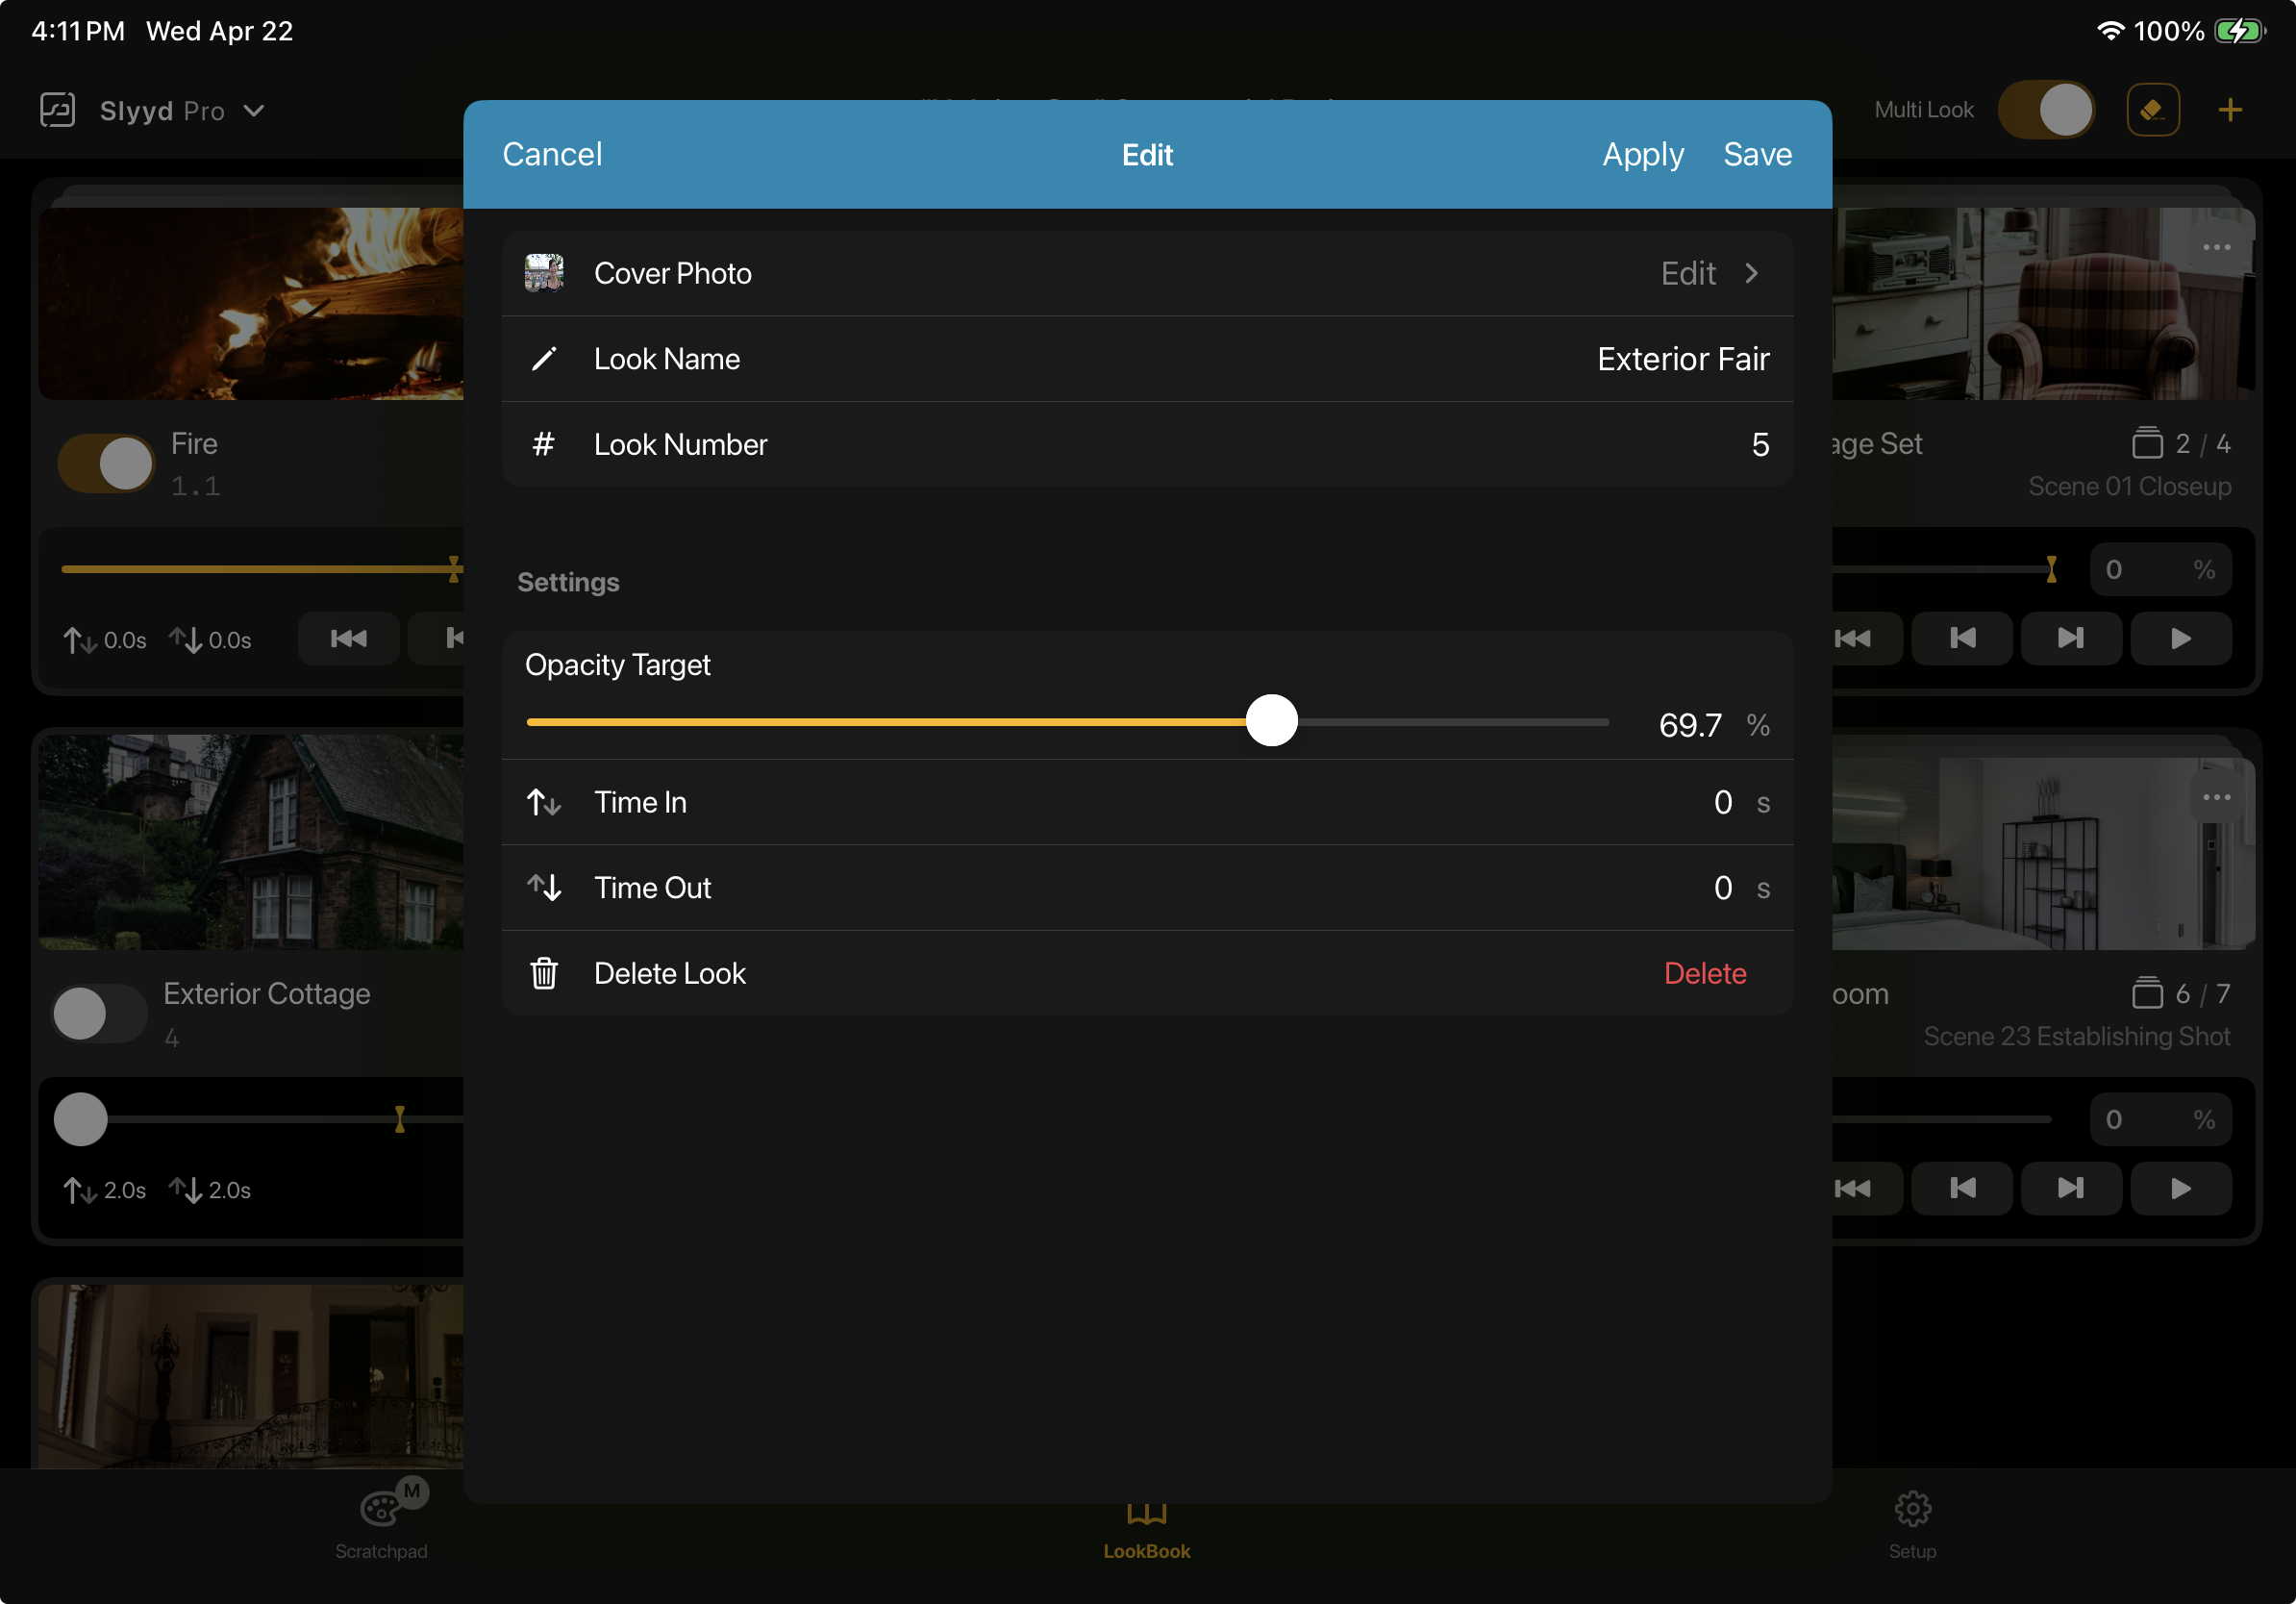
Look Settings
Look settings can be edited upon initial Look creation within the LookBook, afterward at any time by using the three dots button on a Look in the LookBook, or by using the three dots in the upper right corner while editing a Look. All Look Settings can be left at their default values if no changes are desired.
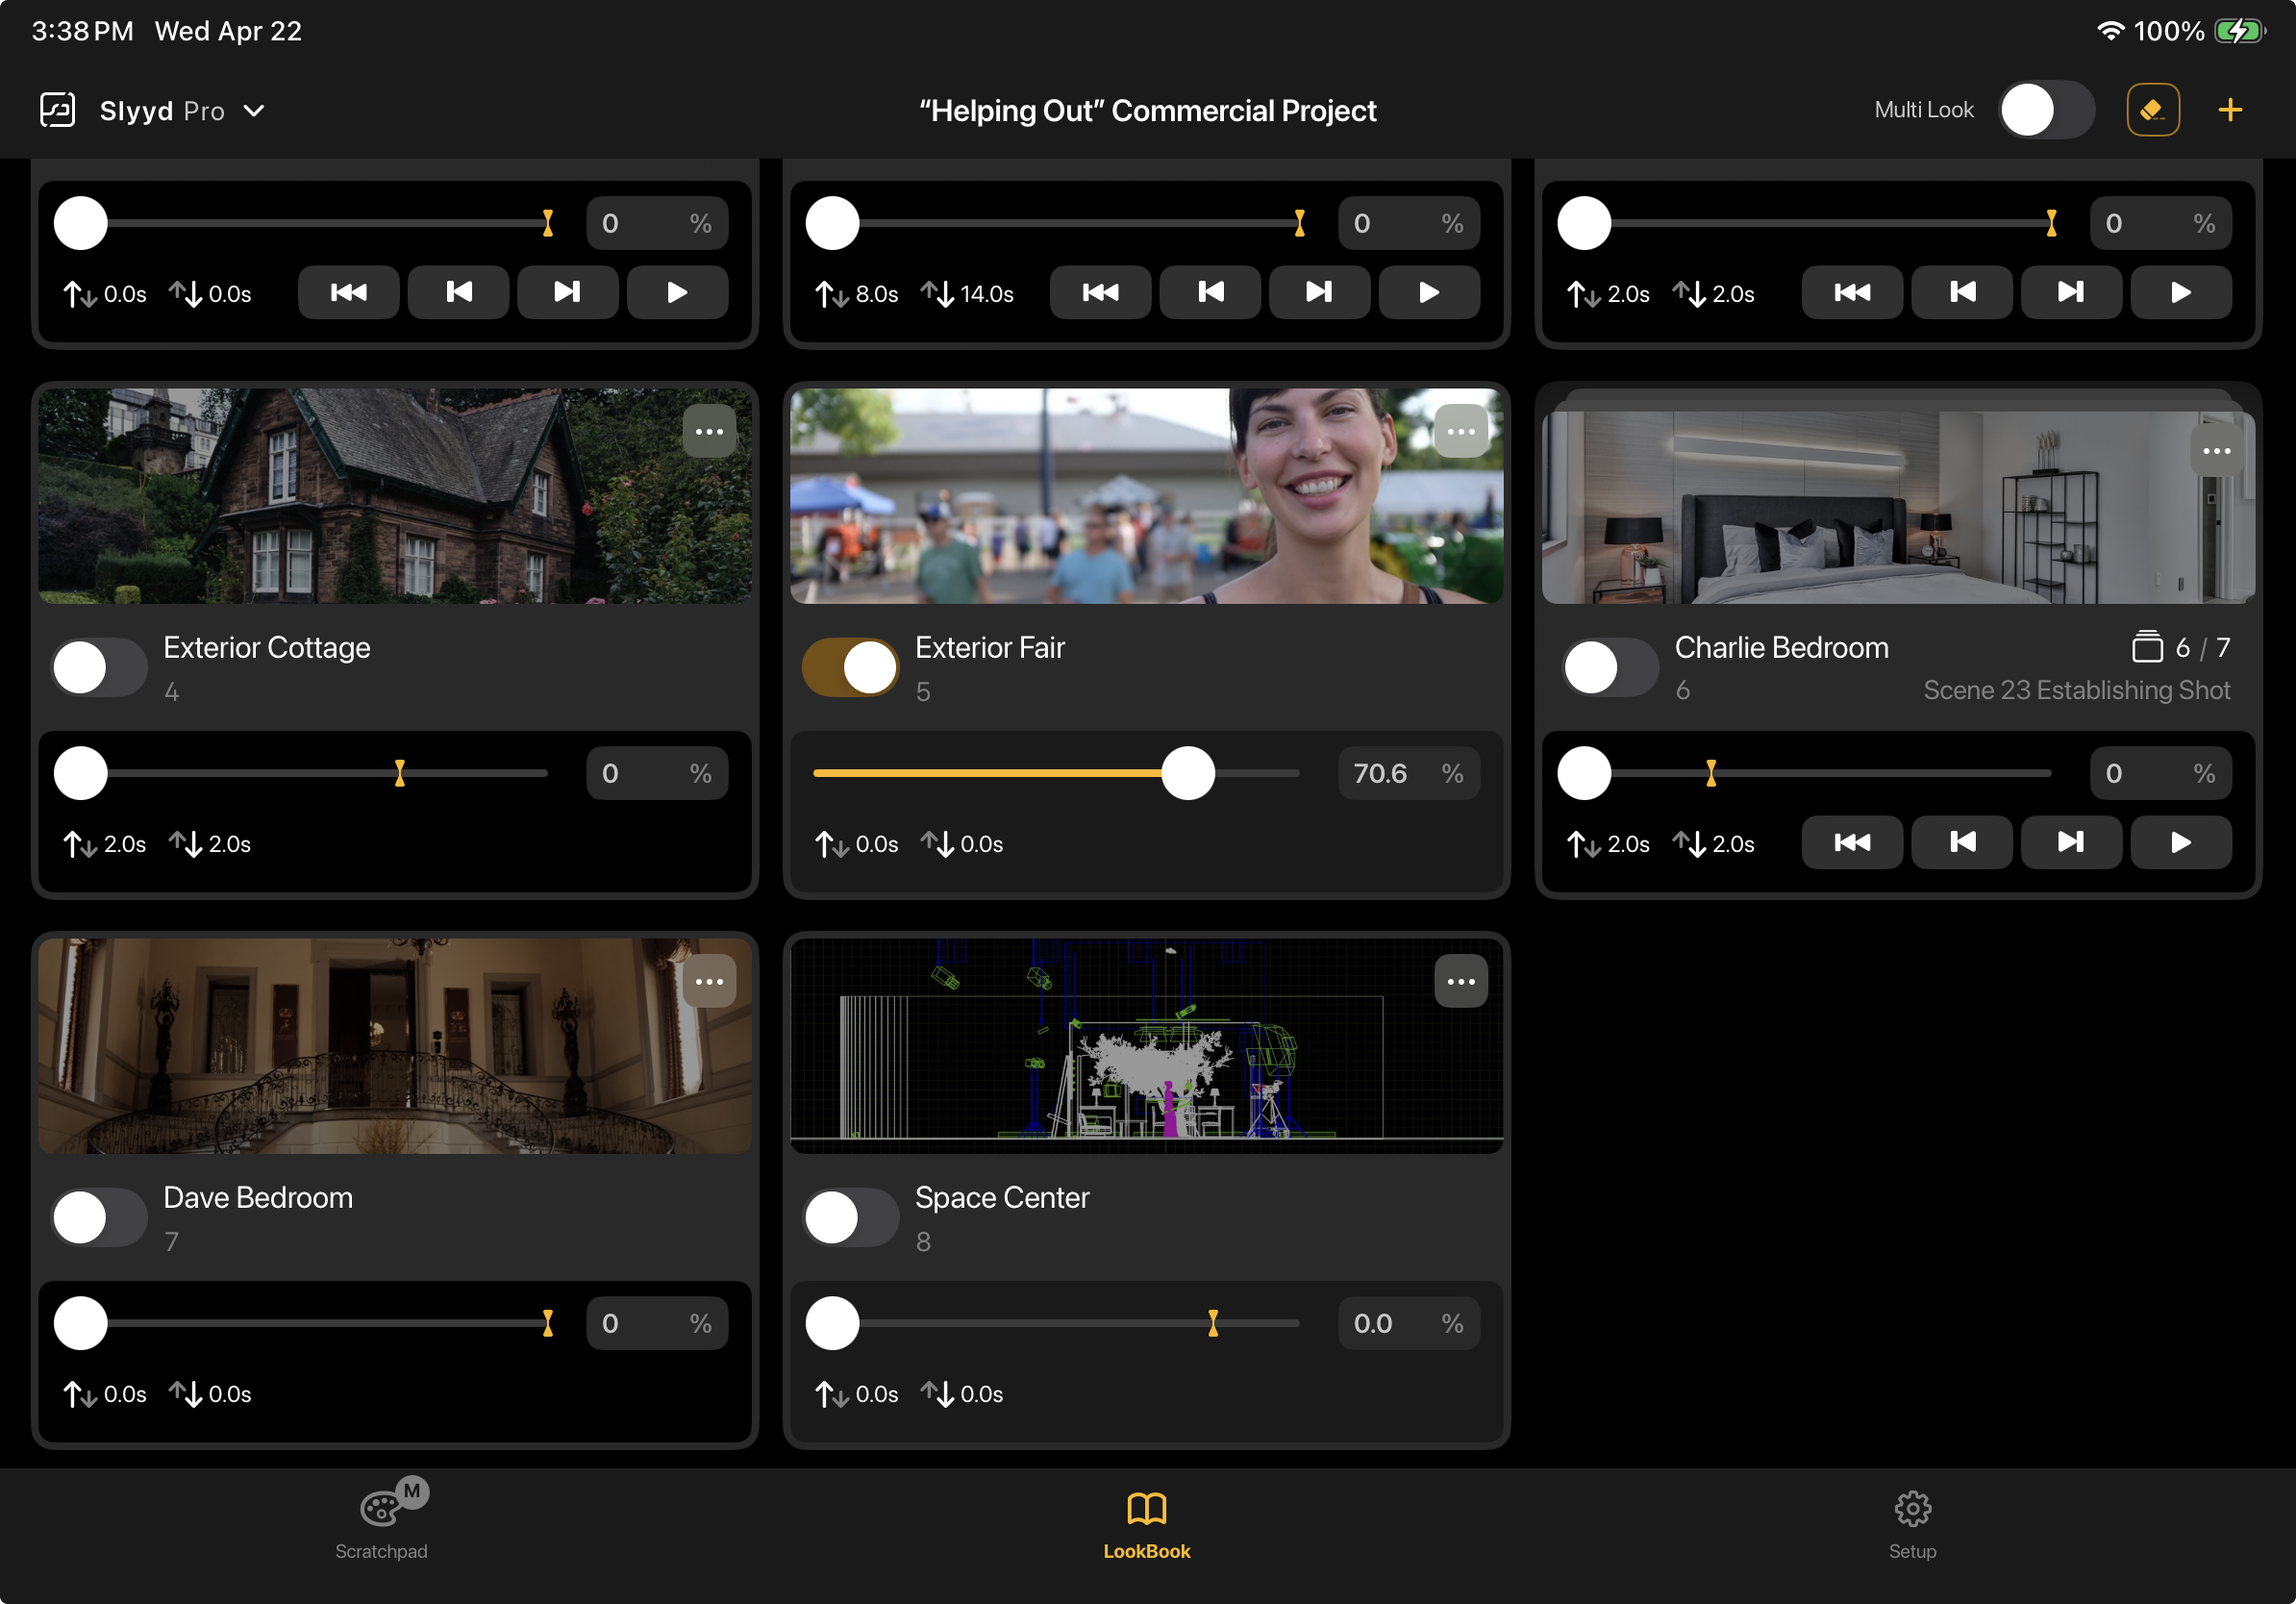
Cover Photo - Sets a photo at the top of the Look as a visual reminder of what is going on in a Look. A random gradient is provided by default.
Look Name and Look ID - How Looks are named and sorted.
Opacity - Sets the opacity for the Look. More information is available in the Opacity section.
Opacity Target - Sets the level the opacity slider will be set to when it is toggled on. More information available in the Opacity Target section.
Time In and Time Out - Sets how long it takes the opacity to reach 100% or 0% when the Look is toggled on or off. More information available in the Time In and Time Out section.
Adding and Removing Fixtures
If there are no fixtures in a Look, there will be a large ‘Add Fixtures’ button that will open the Add Fixtures screen. To add additional fixtures to a Look, press the plus button in the upper right-hand corner.
On the Add Fixtures screen, all fixtures not currently within the Look are displayed with their current values. Selecting multiple fixtures then tapping ‘Add fixtures’ in the Action Bar will add all selected fixtures to the Look with the values currently visible in the Scratchpad.

To remove fixtures from a Look, open the Look, select all fixtures to be removed, then tap the ‘Remove’ button in the Action bar.
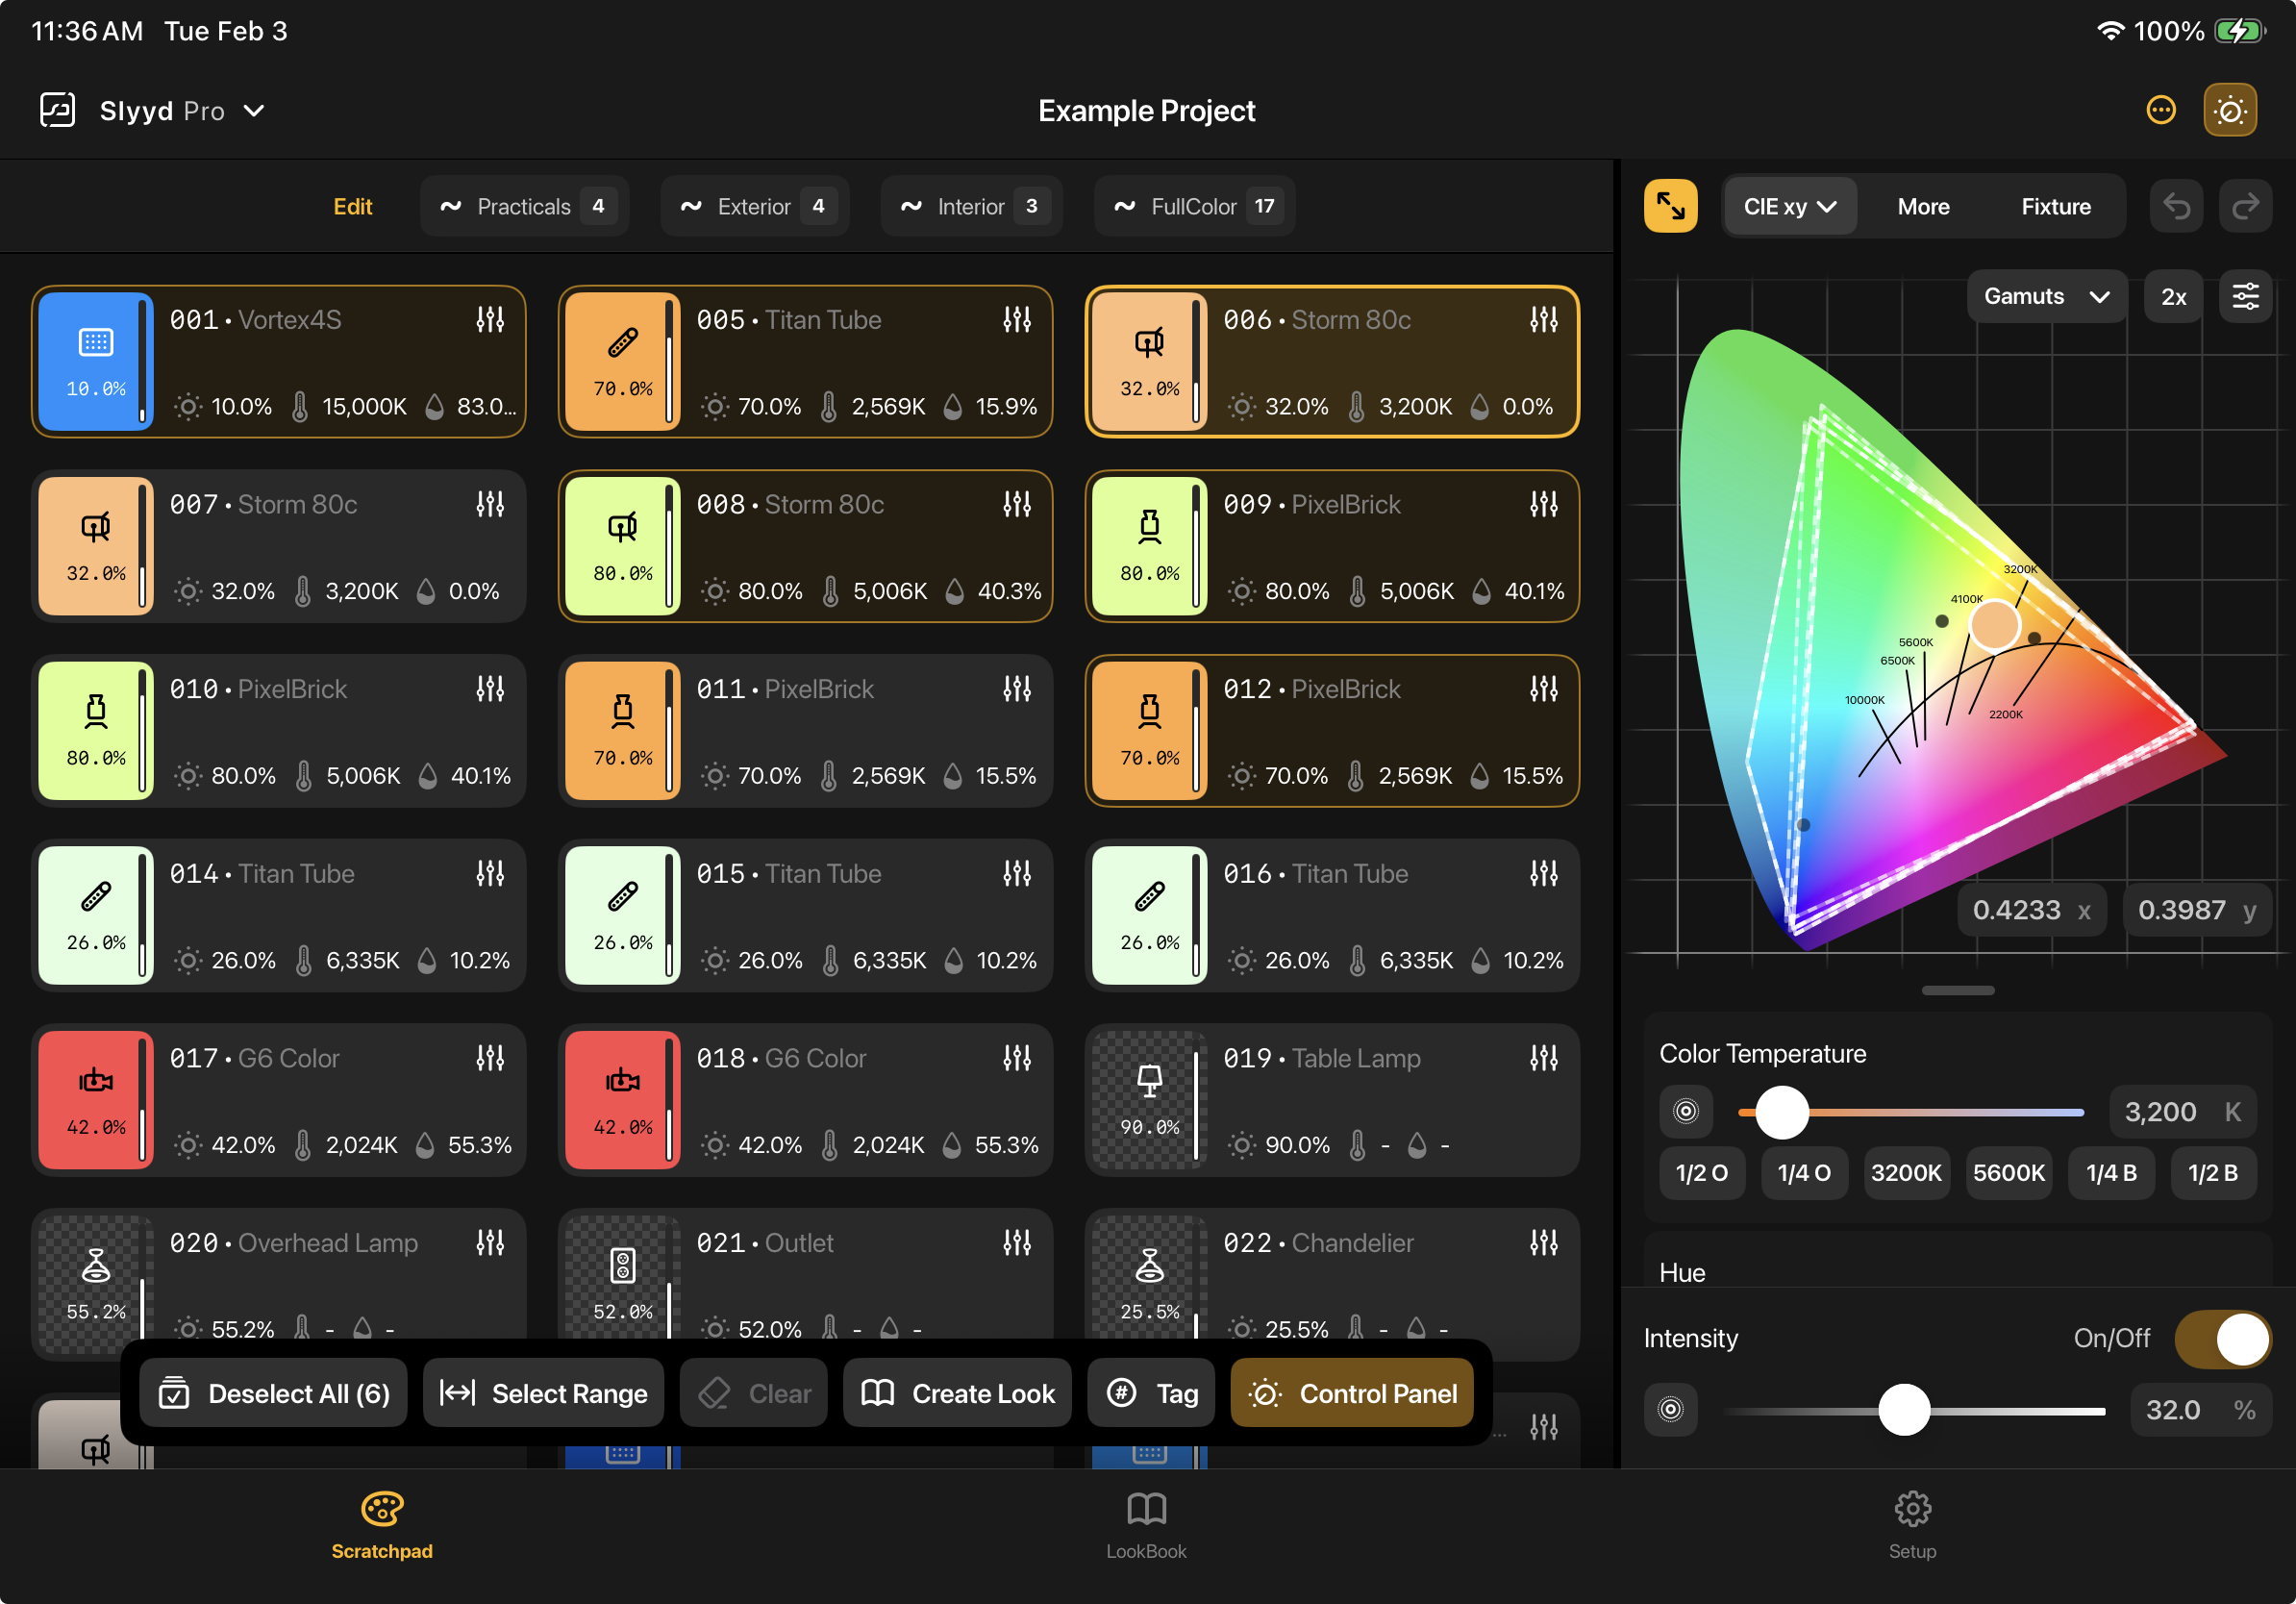
Setting Values in a Look
Once fixtures have been added to a Look, setting values within the Look functions the same way as setting values on the Scratchpad. Both the individual Popover controls and the Control Panel are available within a Look. For more information on these controls, see the Control Panel article.
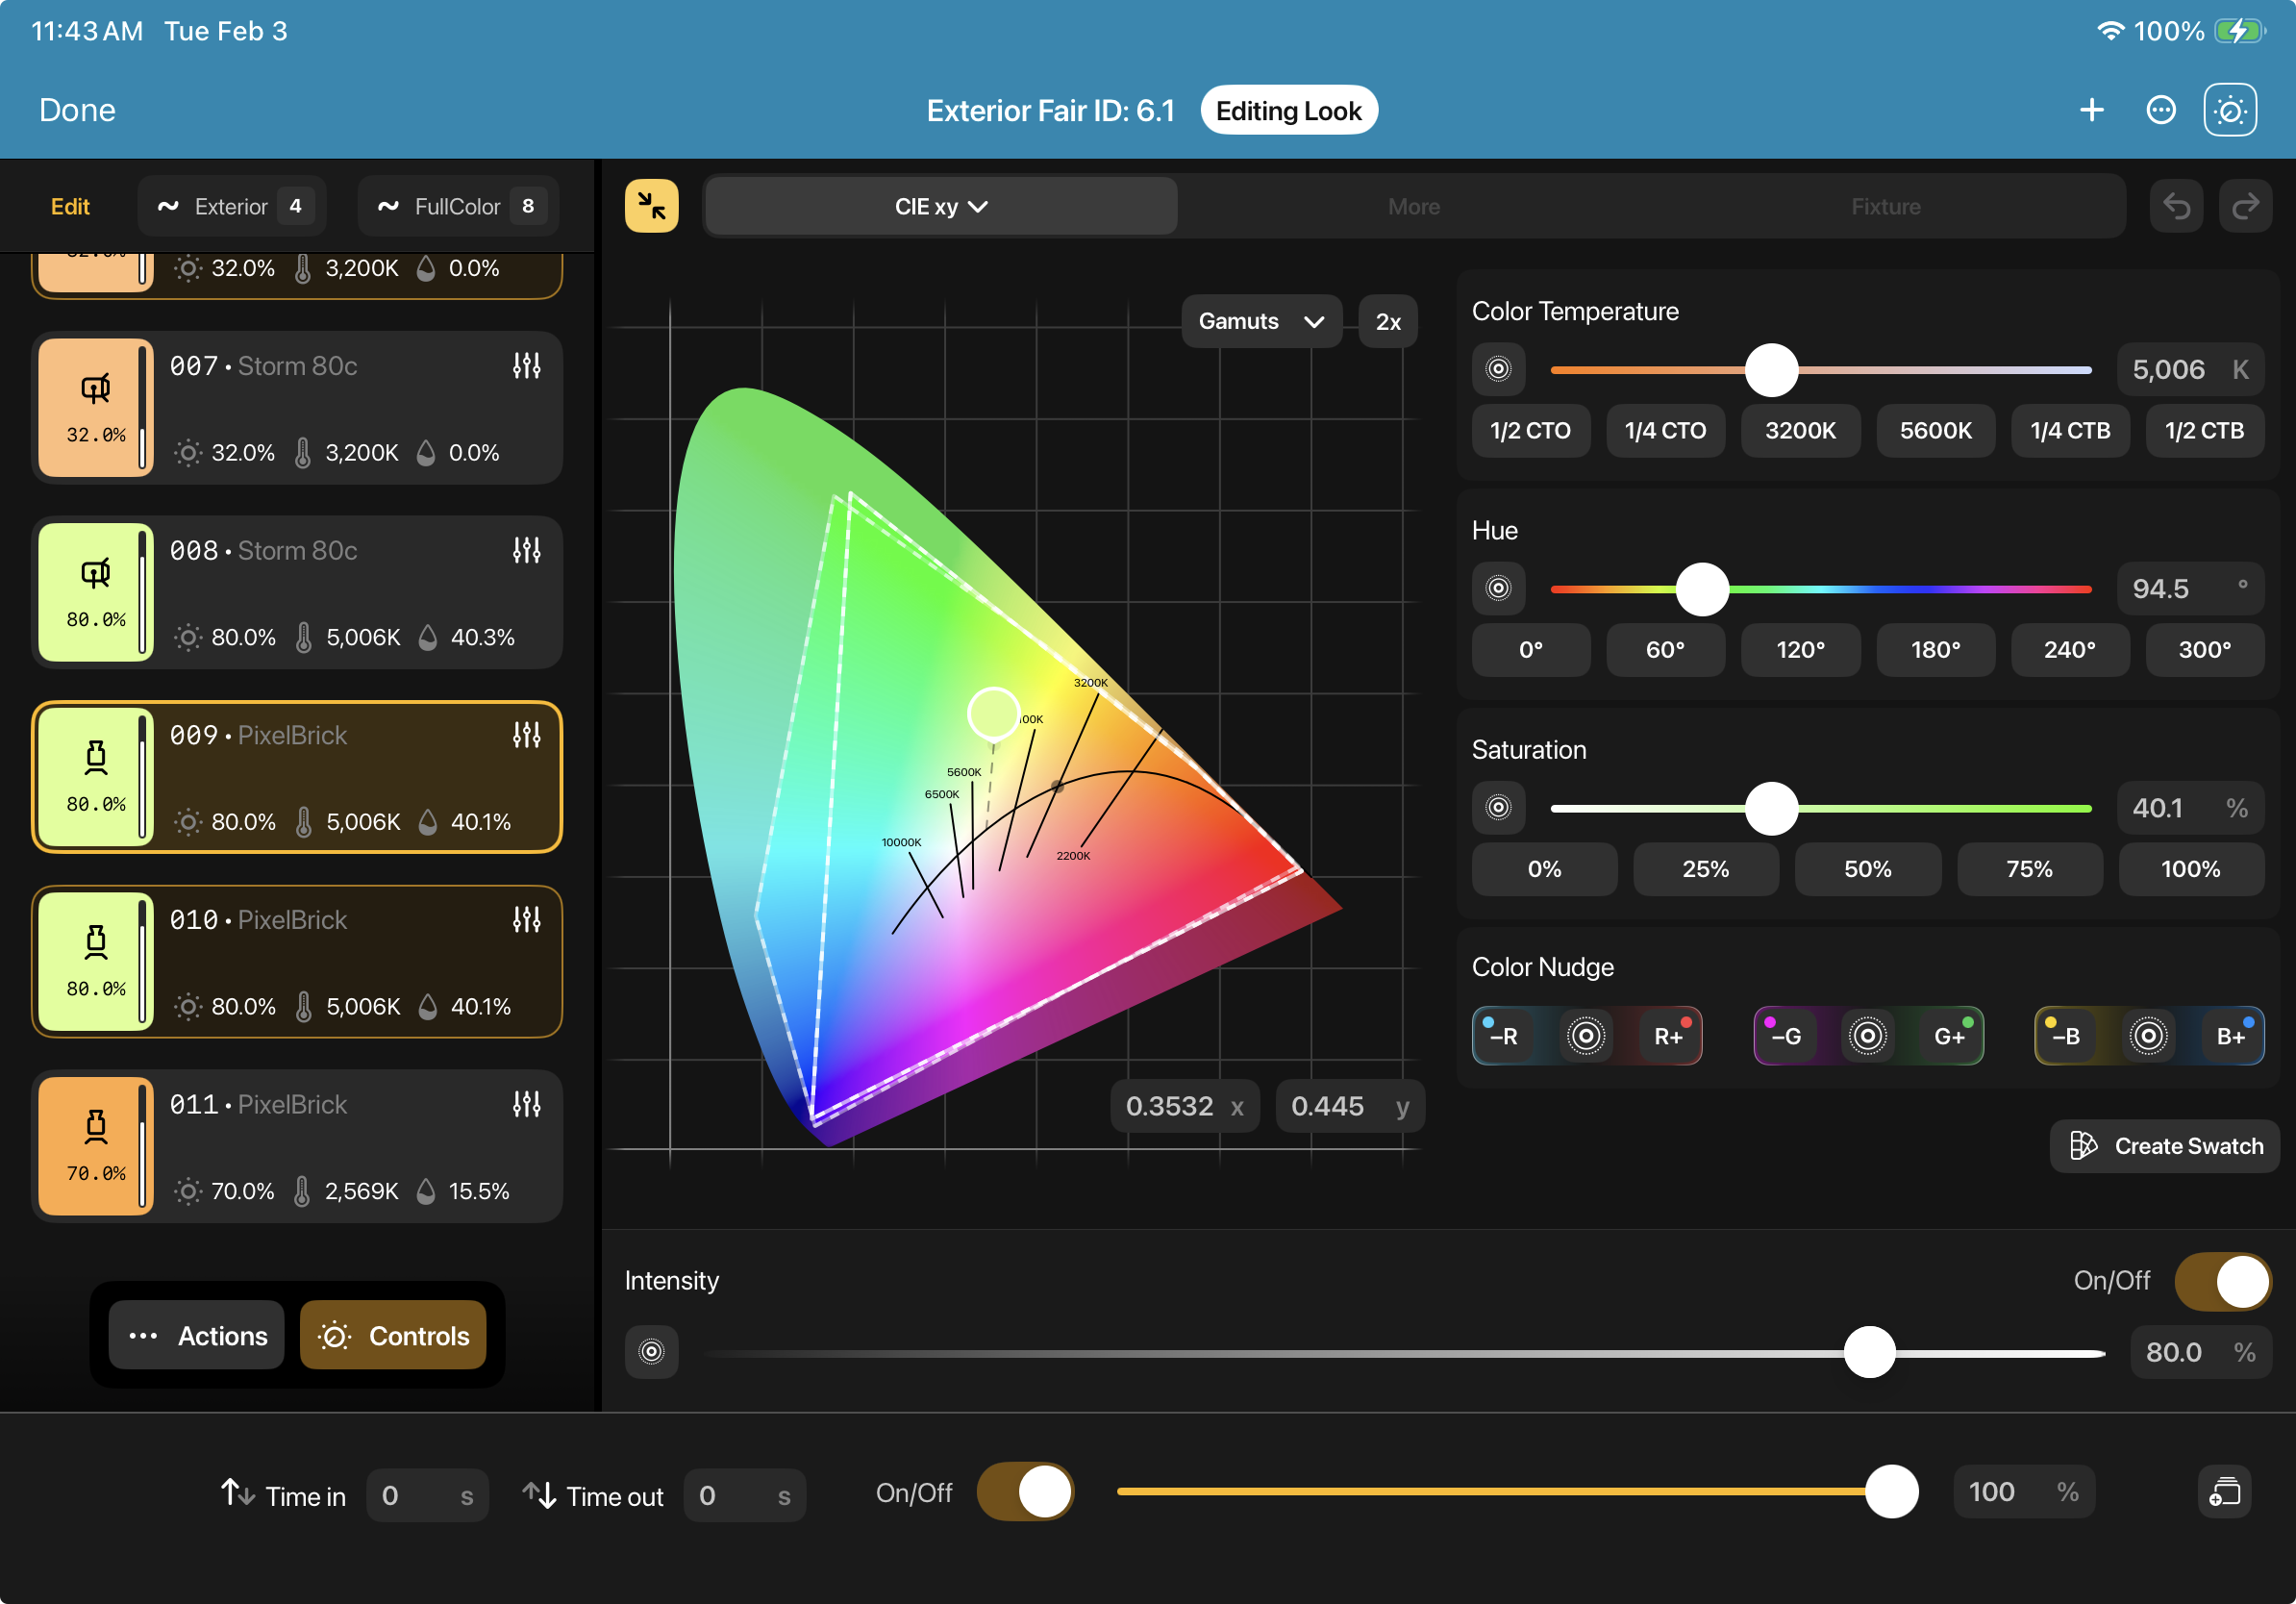
After setting values for a Look, return to the LookBook by tapping 'Done' in the upper left corner. To continue editing the Look, or to edit the values of a different Look, tap the three dots on a Look and choose 'Open'. This opens the Look editor for that Look. The Look editor will always have a blue header at the top to help visually separate it from the Scratchpad.
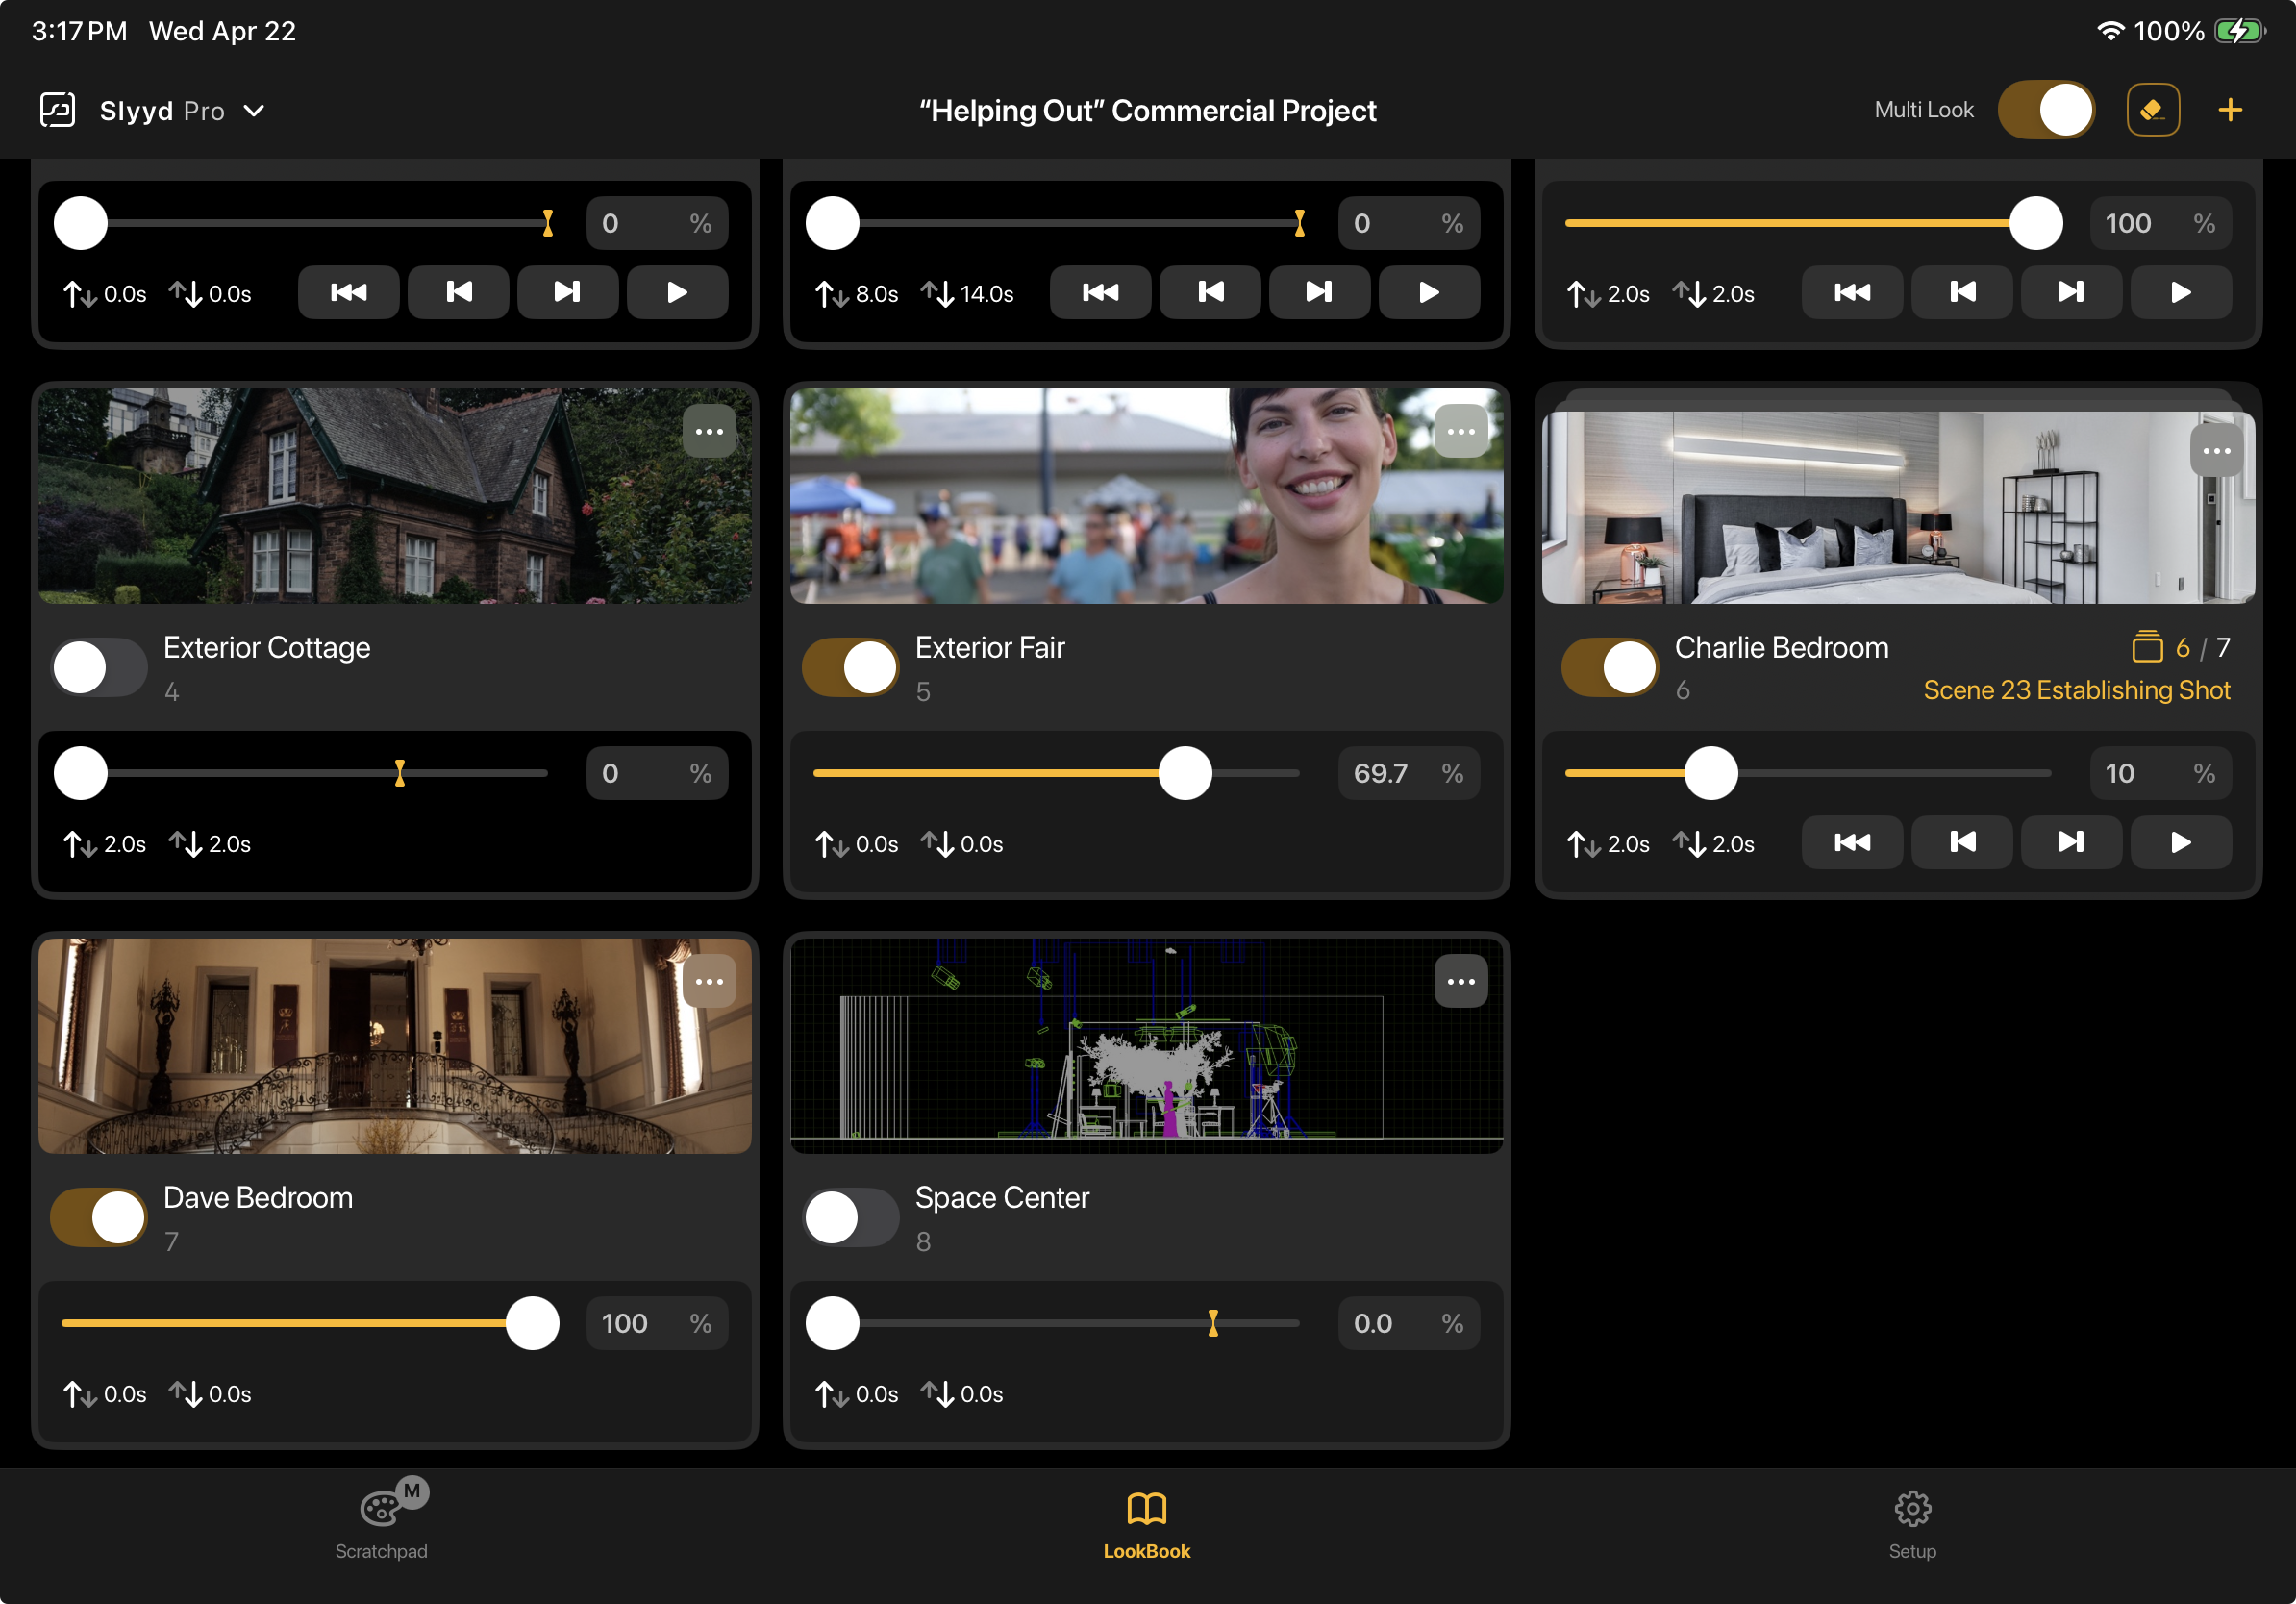
Opacity
The opacity of a Look determines how much of a Look or LookStack is visible. If only one Look is turned on, the opacity slider will appear to control the master intensity for all the fixtures in that Look. But if multiple Looks are turned on, it becomes clear that opacity also plays a role in color mixing.
For example: two Looks contain the same fixture where Look 1’s values are set to red, and Look 2’s values are set to blue. If both Looks are on at an opacity of 100%, the fixture will be a pinkish purple. When Look 1 fades out, the fixture becomes less and less red, and more and more blue. Colors mix in this way to help facilitate transitions between Looks.
Intensity values mix between Looks using highest-takes-precedence.
Opacity Target
The little yellow marker on the Opacity Slider is called the Opacity Target. The Opacity Target can be moved anywhere on the slider and sets the maximum opacity value reached when the Look is turned on using the on/off Toggle. The Opacity Target value can be set numerically from the Look Settings menu, or it can dragged into place on the Opacity Slider.
Time In and Time Out (Transitions)
Setting the Time In determines how long it takes the opacity to reach the Target Value when the Look is toggled on. Setting the Time Out determines how long it takes for the opacity to reach 0 after the Look is toggled off.
Using Time In and Out together with the Opacity Target is a great way to achieve smooth, adjustable transitions between Looks.
Multi Look Toggle
When turned on, the Multi Look toggle allows multiple Looks and LookStacks to be toggled on at once. This is particularly useful when Looks contain different sets of fixtures, or when orchestrating more complex transitions.
When Multi Look is toggled off, turning a Look iLookStack on will automatically turn off all other Looks and LookStacks. Looks and LookStacks that are turned off in this way will still obey their set transition times. This is an easy way to transition from Look to Look with a single tap.